How to install PE-Xa and copper fitting
Leave a message
Step 1.
Measure the pipe to the
correct length and using a
secateur-type pipe cutter,
cut the pipe squarely and
remove any burrs. The end
of the pipe may need to be
freshly cut to ensure smooth
passage for the fitting.
Do not use a hacksaw.

Step 2.
The pipe is pushed over the
barbed fitting and at the
same time under the crimp
ring. The fit should be firm.
If the joint feels sloppy or
hard to insert, check pipe
and fittings. Do not use
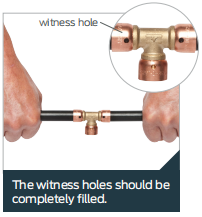
lubricants. Ensure the pipe
is visible in both crimp ring
witness holes.

Step 3.
Make sure the tool jaws are
centralised over the crimp
ring at 90° to the joint.
When using the manual tool,
close the tool completely to
compress the crimp ring.
The tool will click at final
compression.

When using a battery tool, ensure the tool has fully closed and released indicating a completed joint.
Step 4.
For manual tool use,
regularly check with the
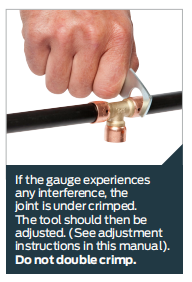
gauge supplied by sliding
the opening of the gauge
over the compressed ring. If
the gauge passes over all
parts of the ring without
interference, then the
joint has been crimped
satisfactorily.
Correctly serviced battery
tools do not require a
gauge check if the joint has
been completed as per
instructions.

Step 5.
Pressure test the system in accordance with AS/NZS 3500 and with local requirements.


